
Matters
Overview
We manage Leads and Matters under the Matters section.
A Matter contains several Platform Functions to help ensure you can successfully manage a Matter for a Client, these include:
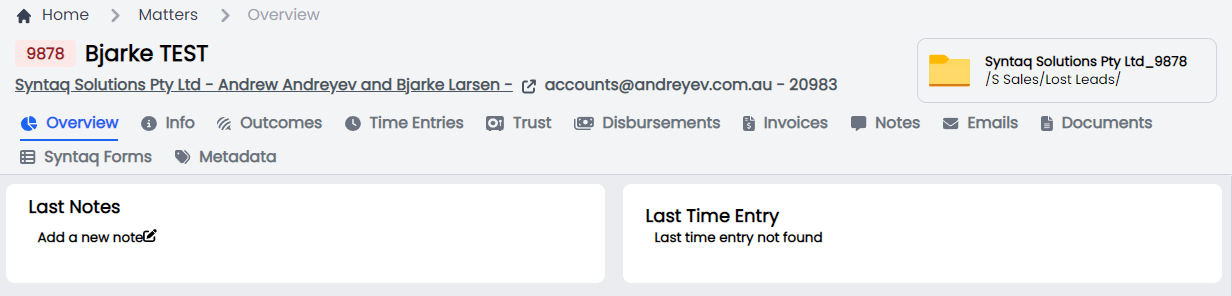
There are also links to the Client and Sharepoint folder associated with the Matter.
Permissions
As a user with Matters permissions, you will be able to Create, View, Edit and Delete Matter Data from the Portal.
To access Matters, you need to have the following permissions.
- Matter.View
- Matter.Create
- Matter.Edit
- Matter.Delete
Matter Search
As you will see across the Platform, we have two main views for most screens – "Assigned to me" and "All".
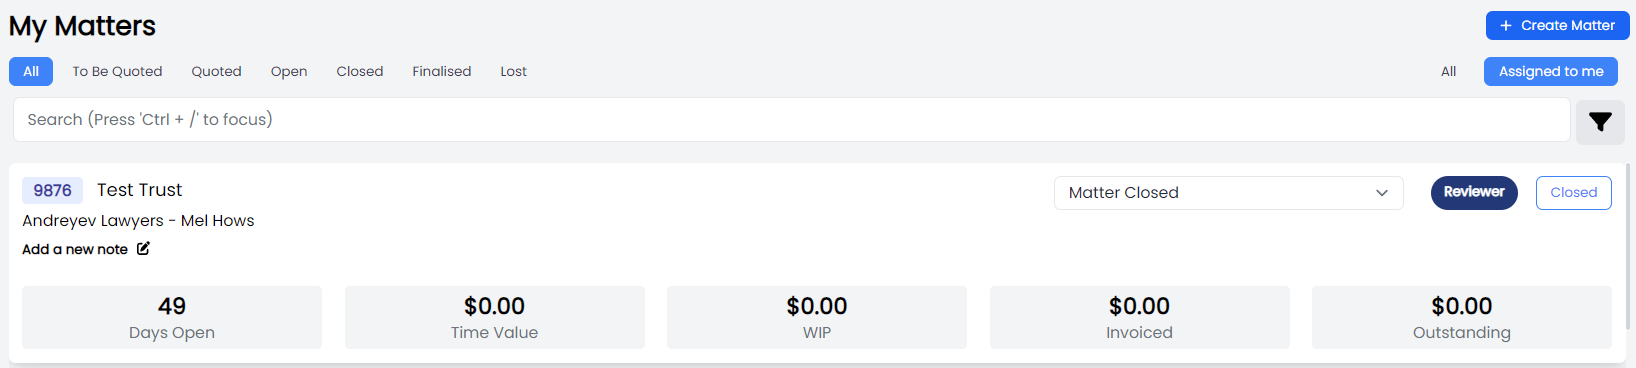
These filter views are there to facilitate the search process and ensure that you are always seeing what is most relevant to you. As the filter describes, "Assigned to me" contains all the Matters that you are assigned.
The Assigned to me view is a more granular view providing you with a detailed view of a Matter including:
- Matter ID
- Matter Name
- Status
- Matter Description
- Most Recent Matter Note
- Days Open
- Time Value
- Amount of WIP
- Amount of Invoiced
- Amount of Outstanding
The All view is a list of all Matters, this view displays:
- Matter Id
- Client Name
- Name
- Status
- Matter Coordinator
- Matter Rating

Matter Lifecycle Stages
This table provides a summary of the various stages, statuses and description of the activities that a user will go through if they were to Managing a matter from creation to closure.
| Stage | Status | Description |
|---|---|---|
| Lead | To be Quoted |
- Initial stage
- User is expected to select Offerings, Outcomes and Components
- User is expected to generate a Work Proposal
| | Lead | Quoted, awaiting acceptance |
- Work proposal has been sent
| | Lead | Lost |
- Client declines to provide information to reach quote stage or rejects the quote, mark as lost
- May be reopened, in which case, we revert to first status
| | Matter | Open |
- Primary stage of the matter
- Will have matter tags for Users to help categories their matters -> waiting for client, High/Moderate/Low etc…
| | Matter | Closed |
- Invoice has been prepared
- Matter has been closed by the lawyer
- Lawyer should indicate if file closure email should be sent
- Lawyer should indicate if referral thanks email should sent
| | Matter | Finalised |
- “Admin” closed
- Physical files have been closed off or shredded
- Misc. other admin related tasks and checks
- Emails sent to client/referrers here if not fully automated, i.e. generated but not sent automatically.
|
Matter Statuses
As we have set out in the Lifecycle Stages table, once a Matter is created it will be set to the state "To be Quoted". This is the first state. To modify the state of a Matter simply click on the Matter Status link. You will be prompted to move the Matter to the next state or to mark the Matter as Lost.
As we move through the Statuses you will prompted to confirm you have take certain actions.
- When changing a Matter to Quoted – you will be asked to confirm you have provided the client with a Quote.
- When changing the Matter to Won – you will be asked to confirm that the client has accepted the Quote.
Add a New Matter
To add a new matter, you can click on the + icon beside Matters under the Matters section of the main menu.
You can also use the + Create Matter button in the top right of the Matters page.

Or or you can use the top icon menu to add a new matter from any page. Click the plus icon and select Matter.
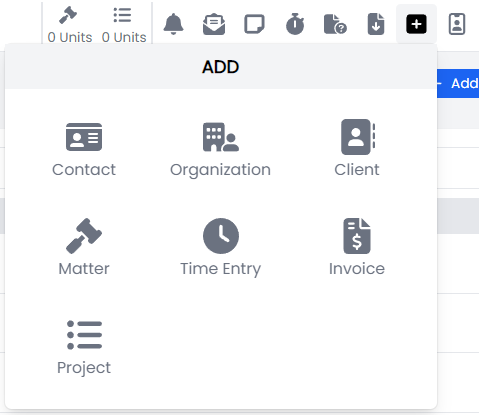
This will open a box, where you can enter all the required details.
- Primary Contact
- Secondary Contact
- Organisation
- Name
- Description
- Reviewer
- Coordinator
- Estimated budget
- First contact date
- Opposing Counsel Emails
- Offering
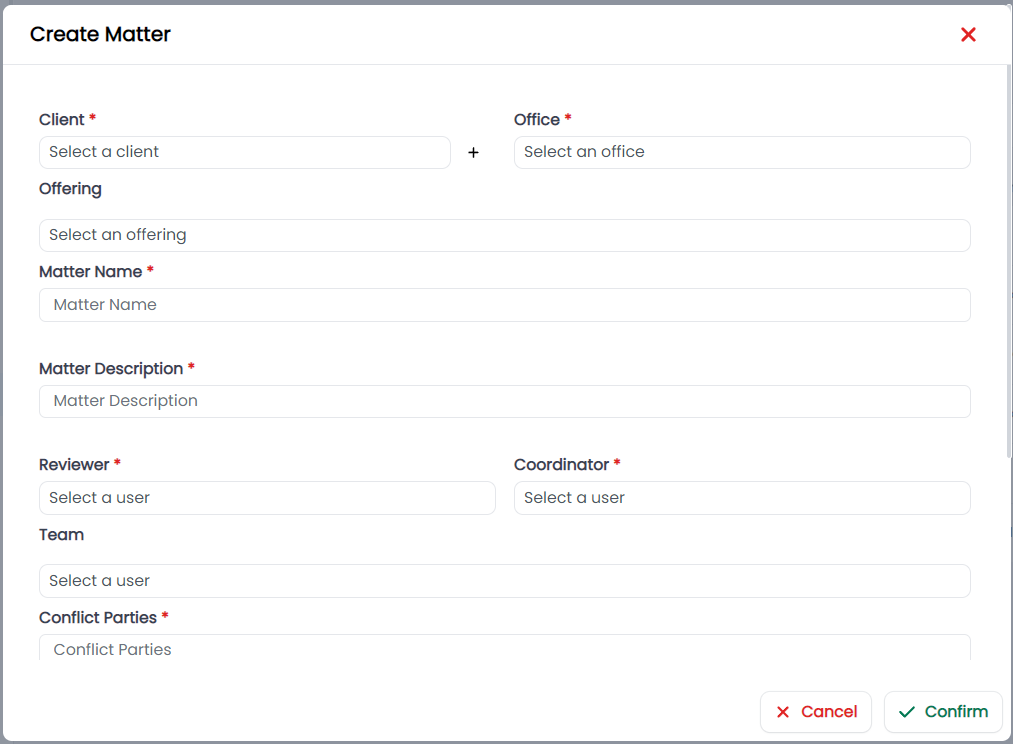
Fill all the details and click on confirm.
Note – you can now add multiple offerings to a matter to ensure you are able to track all your time effectively against the correct offerings and the correct areas of law.
Sections You Can Access From a Matter
- Overview
- Info
- Outcomes
- Time Entries
- Trust
- Disbursements
- Invoices
- Notes
- Emails
- Documents
- Matter SharePoint
- Syntaq Forms
- Metadata
Overview
The overview summary provides a great view on the activities that have occurred on a Matter.
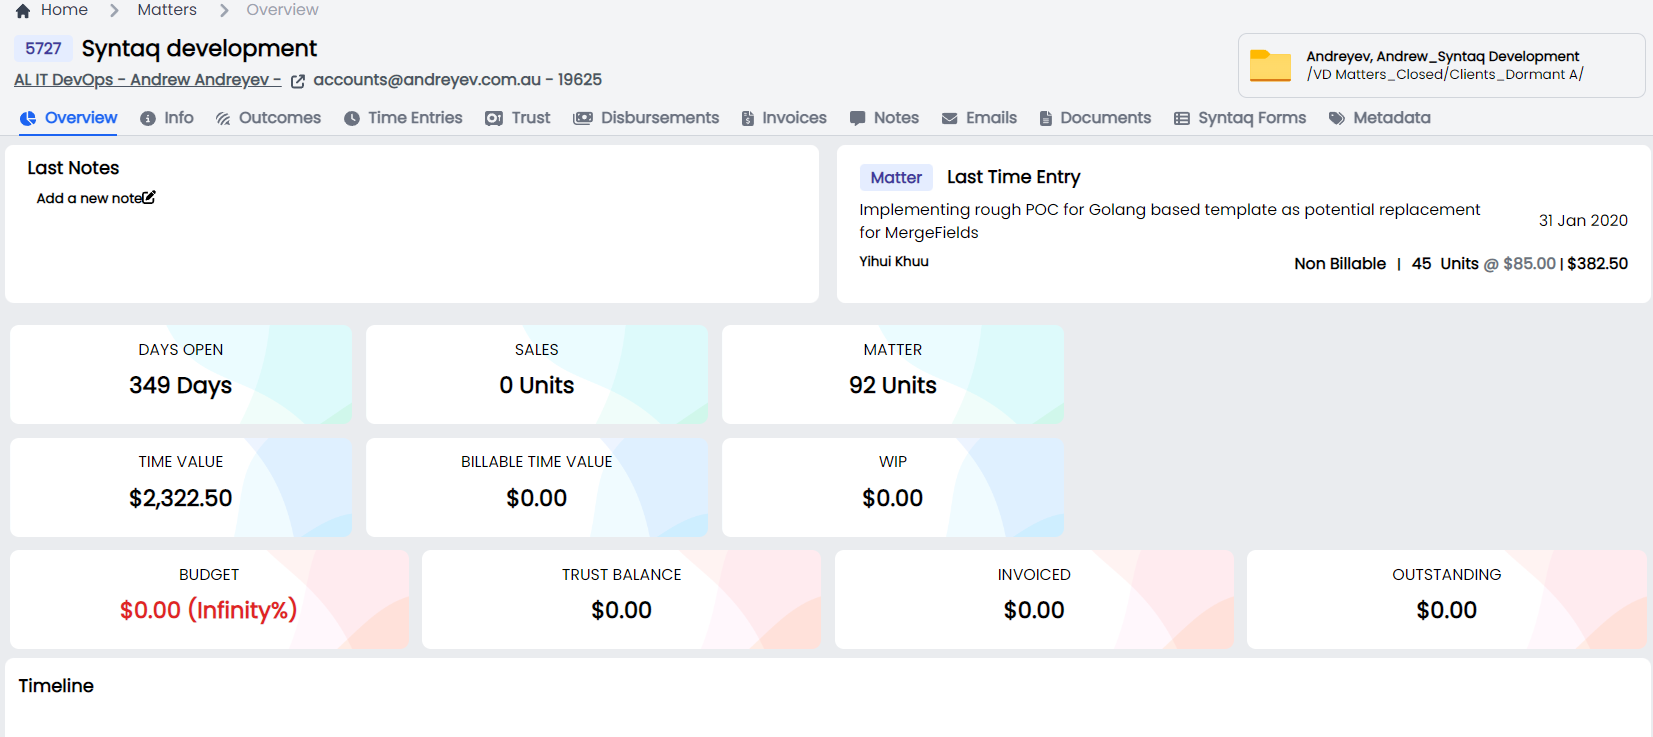
We have created Summary Cards (a.k.a. widgets) which display the following data:
- Last Notes: Most recent Note added to this Matter
- Last Time Entry: Most recent Time Entry associated with this Matter
- Days Open: How long the Matter was/has been open for
- Sales: Total Units recorded as Sales Time
- Matter: Total units recorded as a Matter
- Time Value: Total value of Time invested on a Matter based on Time Recorded x Rate (excluding Disbursements)
- Billable Time Value: Total Value of the Billable Time Entries on a Matter based on Billable Time Entries x rate (Excluding Disbursements)
- WIP: Total value of Time Entries yet to be billed
- Budget: Expected quote for this Matter
- Trust Balance: Amount held on Trust for this Matter
- Invoiced: Amount invoiced for this Matter
- Outstanding: Amount unpaid for this Matter
In addition to the Summary Widgets, we now have a timeline which tracks the key event changes on a Matter, including:
- Status Updates
- Personnel changes
Finally, we can now track Matter Lead time (Total Lapsed Time) by Status, which shouldn't be confused with Matter Cycle Time (which looks at Total Time Recorded per Status);
- To be Quoted
- Quoted Awaiting Acceptance
- Lost
- Open
- Closed
All statuses have a Days/ Hours/ Minutes counter so you can view the time duration at each status.
Info
In the Info section we capture all the key information about a Matter.
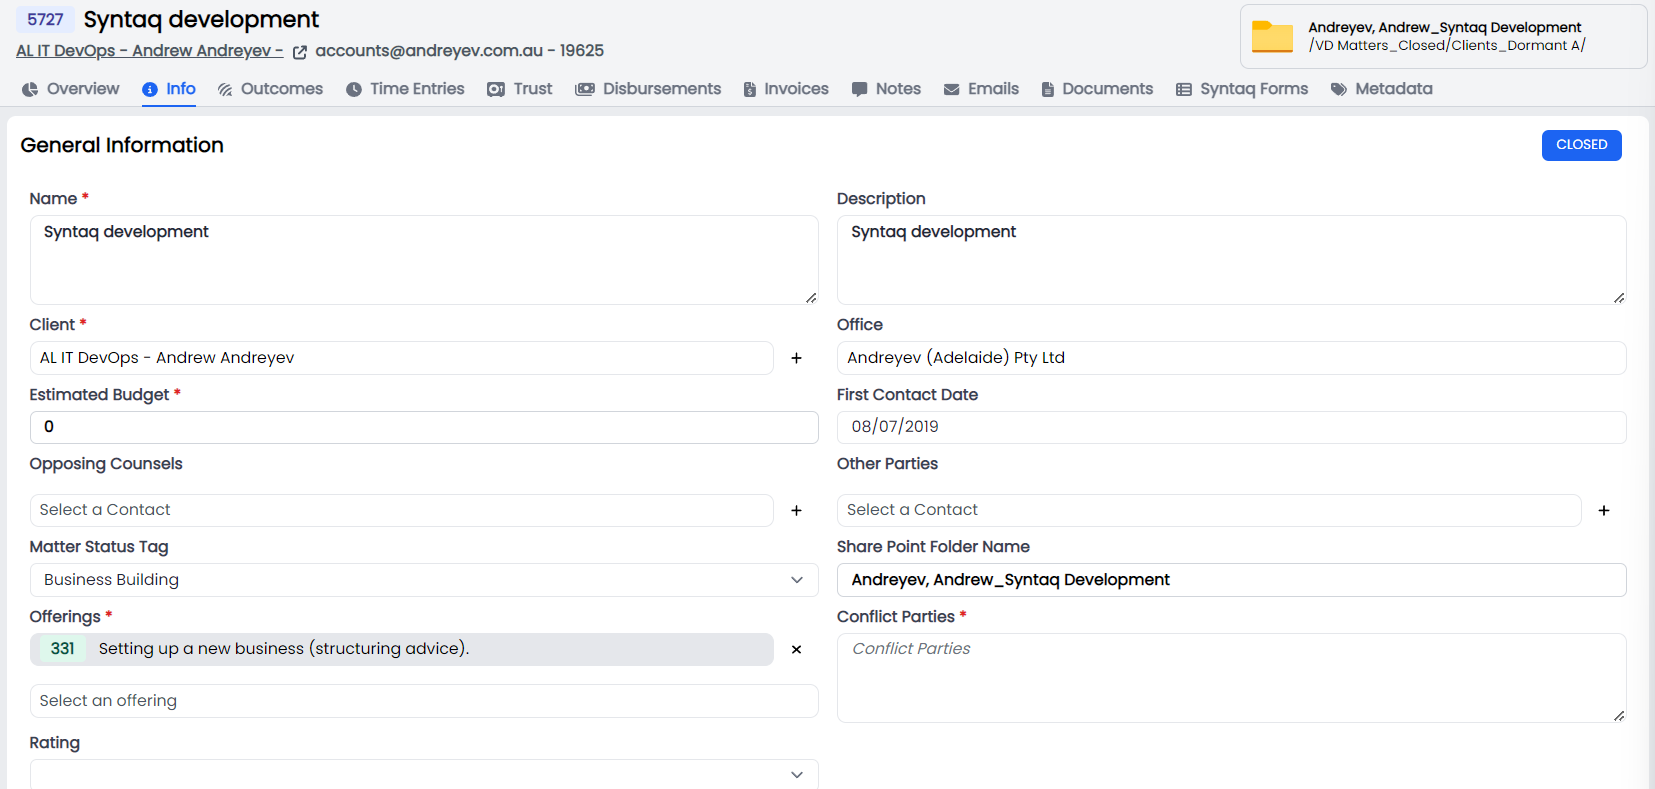
These data fields are set out below:
- General Information
- Name
- Description
- Client
- Office
- Estimated budget
- First Contact Date
- Opposing Counsels
- Other Parties
- Matter Status Tag
- Share Point Folder Name
- Offerings
- Conflict Parties
- Rating
In the General Information section we can also see the Matter Status in the top right corner. Clicking this will open a modal that allows you to update the Matter Status.
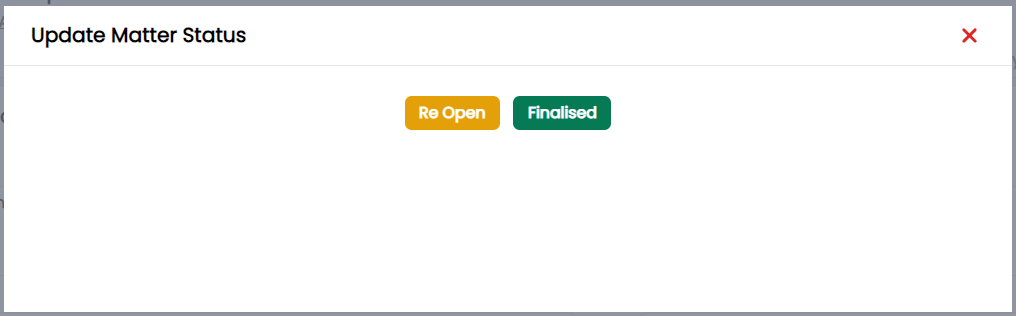
Options here will depend on the current Matter Status.
- Team
- Reviewer
- Coordinator
- Team
The Team section also gives you quick links to email the Reviewer, Coordinator, and Team Members for this Matter, either as a group, or individually.

Simply click the relevant envelope icon to begin drafting your email.
- Cost
- Billable Status
The cost section also gives you the options to indicate a Deferred fee or Apply Uplift or Downlift to Rate with checkboxes. If you are applying uplift or downlift to the rate you will be asked the rate adjustment percentage.

You can also download a WIP report for this Matter from the Cost section.
Outcomes
In the Outcomes section you will see a list of Outcomes you selected when establishing a Matter. If there are no Outcomes you can add Outcomes to the Matter. If you no longer require a particular Outcome you can also Delete the Outcomes from a Matter.

Add an Outcome
To add an Outcome to an established Matter, click on the + Add Outcome button in the top right corner and then simply select the Outcomes you wish to add to the Matter.
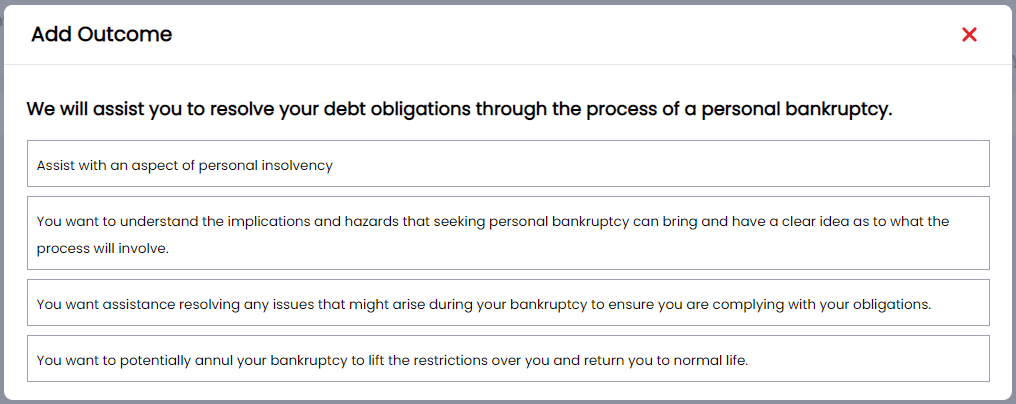
You will only be able to select Outcomes associated with the Offering this Matter falls under.
Delete an Outcome
To Delete an Outcome from a Matter, search for the Outcome you wish to Delete and click the red trash icon on the right hand side. If the Outcome has Components, you will need to delete the Components first.
REMEMBER – You can't delete an Outcome that already has time entries associated with its Components.
Adding Components to an Outcome
Once you have added Outcomes to a Matter, all associated Components are automatically added to the Outcome
Deleting a Component from an Outcome
If you find that there are several components that are not necessary for your Matter you can delete them by clicking the red trash icon on the right hand side.

REMEMBER – You can't delete Components that already have time entries.
Matter Resources
Click on the Component to view the relevant Resources for that component. To add and edit Resources to a Matter, click on the ellipse and click "Add to Matter".
When you click Add to Matter, the resource is added to the Documents section, where you can view, edit and delete a Resource.
You can also download the resources by clicking on the ellipse and then clicking Download.
Timers
Components now have Timers, so that as you work through your Matter you can track your activity. To do so, simply click on the green play button next to the component to start the timer.
To Pause a Timer click the Orange Pause button, or to log your time to a Matter click on the Red Stop button. When you Click Stop you will be presented with a Pop Modal which contains the following fields:
- Date (this defaults to today's date)
- Units (sum of the units calculated while the timer was running)
- Rate (your billable rate)
- Billable (you can elect to change this to Non Billable or Non Chargeable as required)
- GST Type (the default is GST 10%)
- Description
Click the Confirm button to submit your Time Entry.
Users
For each Component you can assign an owner, assigning an Owner to a Component will trigger a Notification to the User. The Matter Coordinator is automatically added to a Component when the Outcome is first added to the Matter.
Delivery Date
In addition to the Component Owner, you can also assign a scheduled Delivery Date to a Component.
Time Entries
You can add time entries directly to a Matter through the Time Entries section.
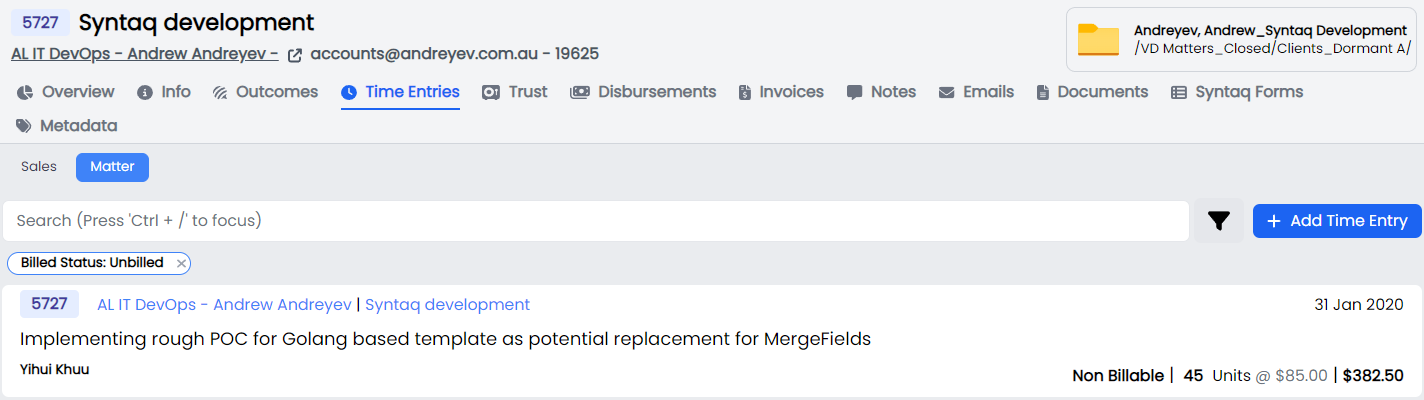
To do so, click on Time Entries, and the + Add Time Entry button.
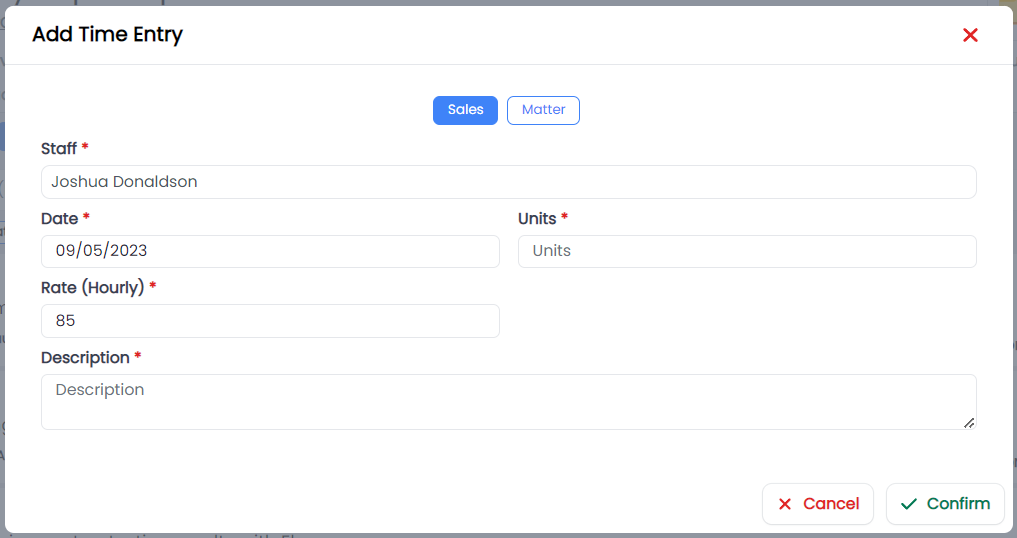
You will be prompted to enter a Sales Time Entry or a Matter time Entry. Depending on your choice you will be presented with different input criteria.
Sales Time Entries include:
- Matter (Set by default to this Matter)
- Staff (Logged in user by default)
- Date (Defaults to today)
- Units
- Description
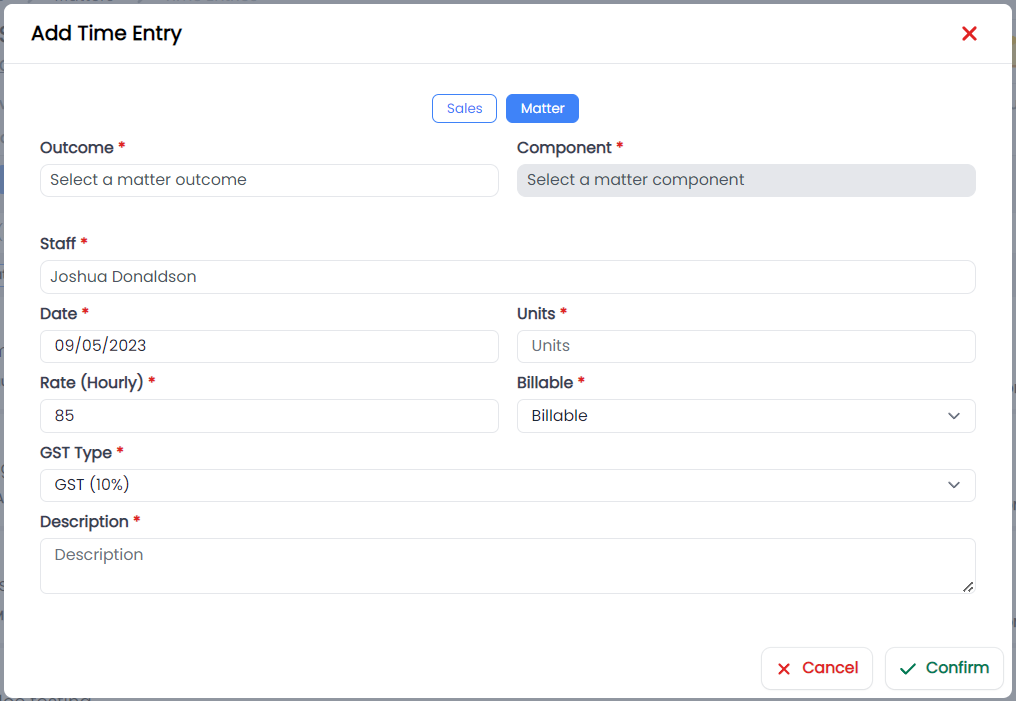
While Matter Time Entries include:
- Matter (Set by default to this Matter)
- Outcome (Limited to outcomes assigned to this Matter)
- Component (Limited to Components assigned to the selected Outcome)
- Staff (Logged in user by default)
- Date (Defaults to today)
- Units
- Rate (Rate given to logged in user by default)
- Billable Type (Billable / Non-Billable / Non-Chargeable)
- GST Type (GST 10% / GST Export 0% / BAS Excluded 0%)
- Description
You can also filter your time entries on a Matter by selecting the Sales or Matter filter or using the search box located at the top of the page.
Trust
The Trust Section of a Matter allows you to view the Trust Requests and Transactions for the Matter.
In each Trust view there are 2 expressions of the total funds held on Trust for the Matter:
- Available: The amount of Trust money that has been approved.
- Balance: The total amount of Trust money recorded against the Matter, including Pending Transactions.
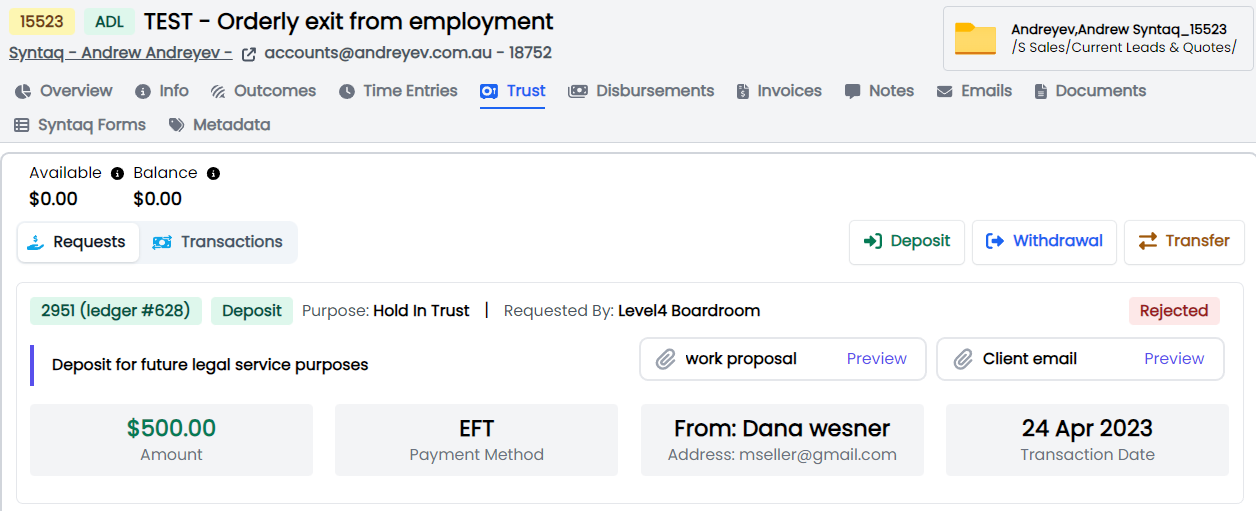
Trust Requests
The Requests view shows all requested Transactions for the Matter, including transactions that have been Approved, Rejected or are Pending.
Information displayed for each Request includes:
- Transaction Id & Ledger Id
- Transaction Type (Deposit / Withdrawal / Transfer)
- Purpose
- Requestor
- Description
- Supporting Document Links
- Amount
- Payment Method
- From/To
- Transaction Date
- Request Status (Approved / Rejected / Pending)
Trust Transactions
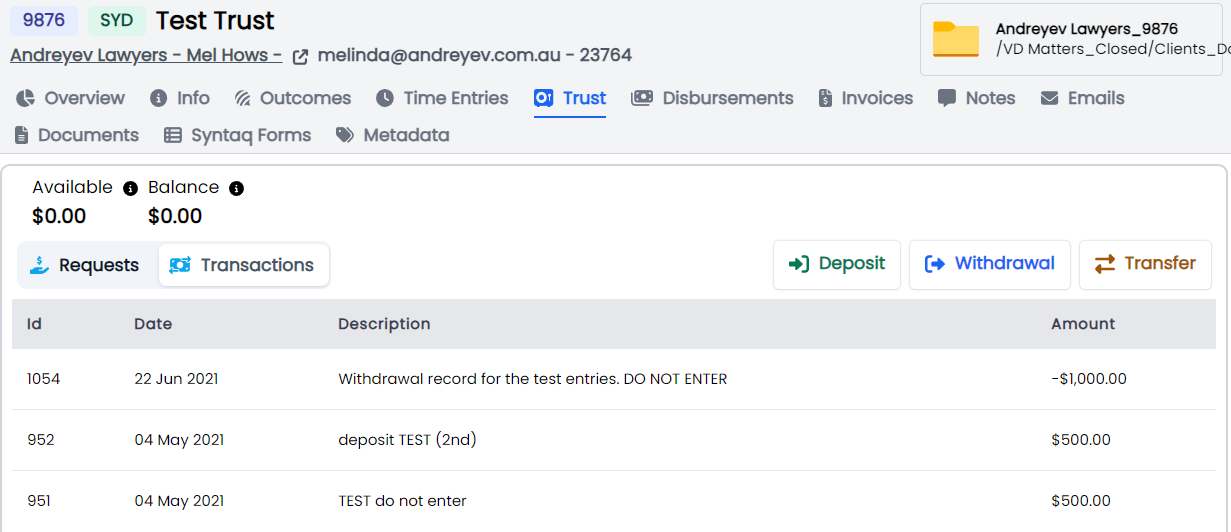
The Transactions view shows all approved Transactions for the Matter.
Information displayed for each Transaction includes:
- Transaction Id
- Transaction date
- Description
- Amount
Add a Trust Request
You can add a Trust Request for a Matter by clicking the relevant Deposit, Withdrawal or Transfer buttons in the top right of either the Requests or Transactions view.
Clicking the button will open the relevant Transaction modal.
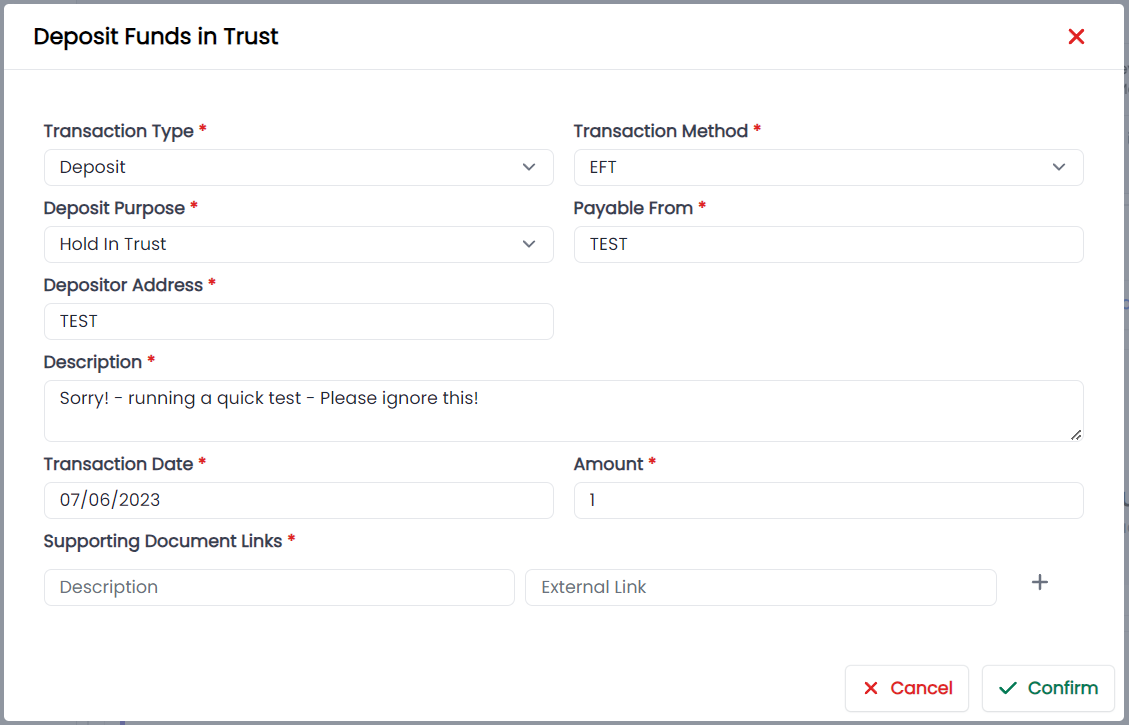
Fill out the details and click confirm to create your Request. This will trigger a Trust Notification email to trust@andreyev.com.au and from there the Trust Accounting team will approve or reject the request.
Details on how to fill out Trust Requests can be found in the Trust Accounts section.
Approve or Reject a Trust Request
For users with the required permissions, Trust Requests can be Approved or rejected via the Trust Account - Pending Requests page, which is accessed from the Administration Menu.
Disbursements
Disbursements are one-off costs incurred as part of the Matter which will need to be included in the invoice. The Disbursements section allows you to view all Disbursements already added to the Matter and add Disbursements to the list.
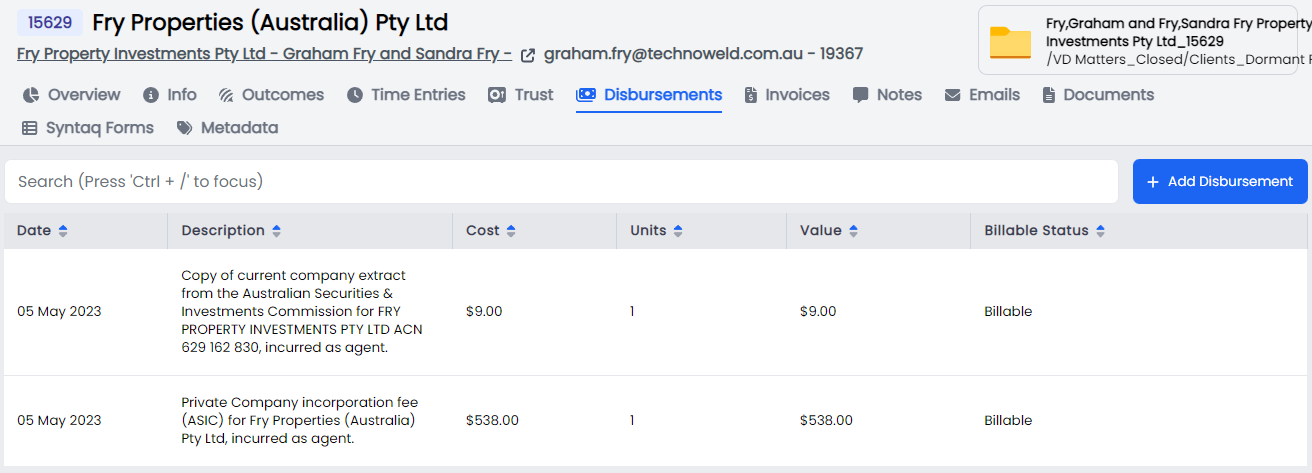
Data available in the table includes:
- Date
- Description
- Cost
- Units
- Value
- Billable Status (Billable / Non-Billable / Non-Chargeable)
You can edit a Disbursement by clicking the item in the list, updating any of the details and then clicking Confirm.
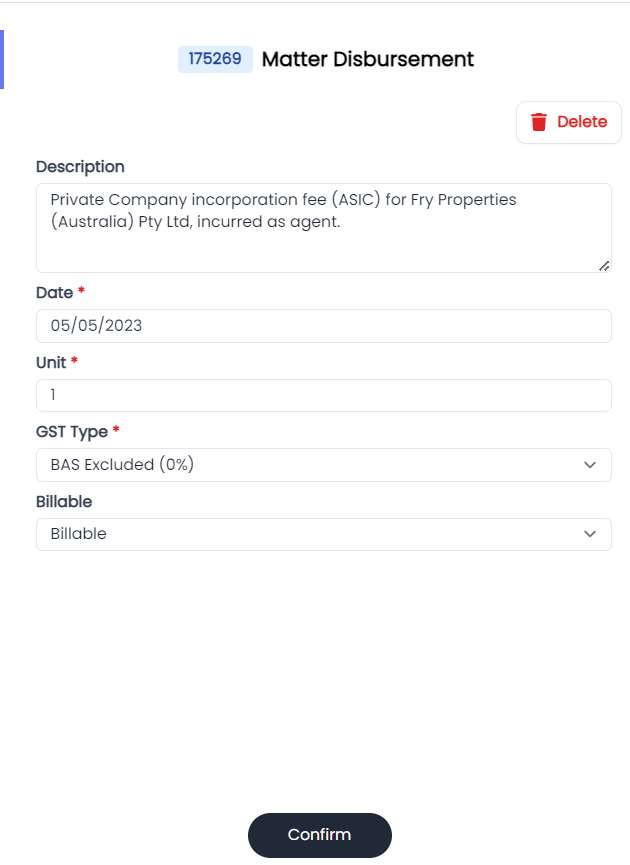
You can also delete a Disbursement if you have added it in error, by clicking the item in the list and clicking the delete button.
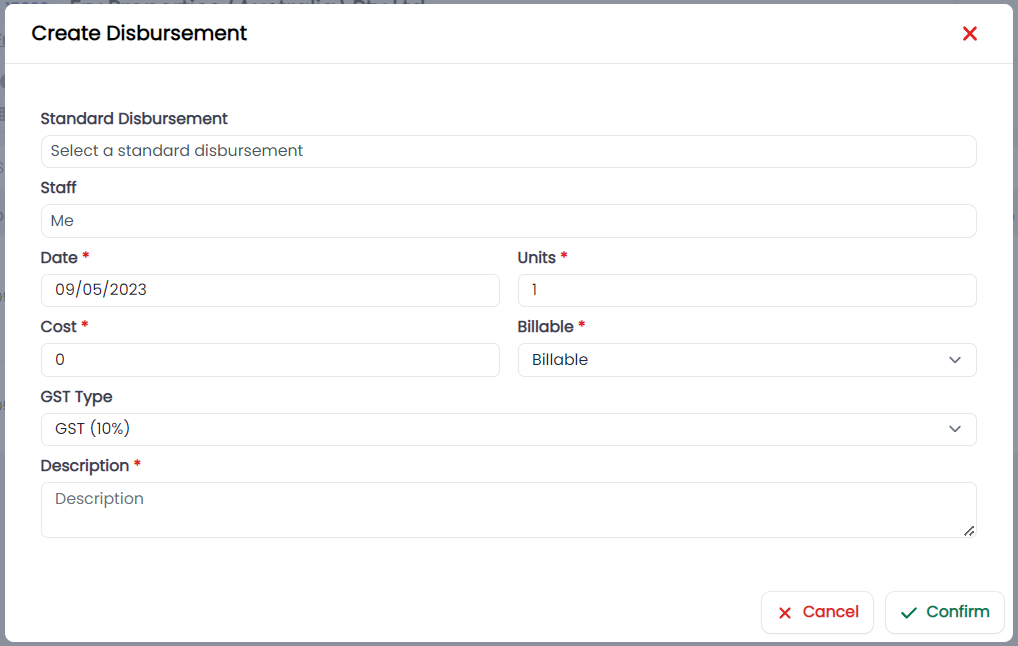
You can add a Disbursement by clicking the + Add Disbursement button at the top right of the page. This will open a modal which will allow you to add details of the new Disbursement.
Remember when adding a disbursement the GST Status default is GST (10%), change as required.
- GST (10%) is used when GST is charged by the supplier.
- GST Export is used when the invoice is prepared for a client who does not reside in an Australian territory for GST purposes.
- BAS Excluded is used when GST is not charged by the supplier (ie GST free).
- Incurred as agent should always be suffixed to the disbursement
Invoices
The Invoices section provides a list of invoices created for this Matter.
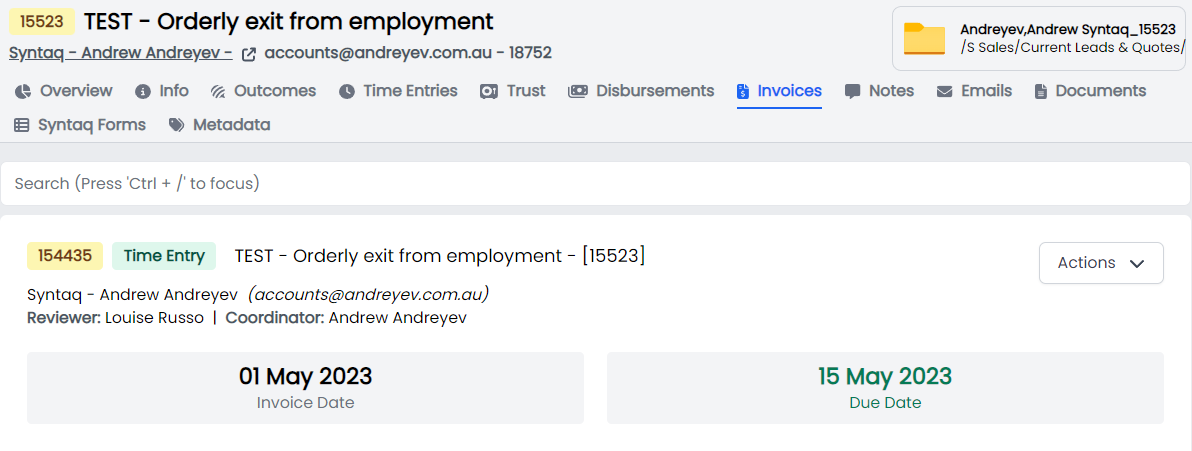
Each Invoice in the table contains information on:
- Invoice number
- Invoice method (Time Entry / Fixed Price)
- Matter Name and Matter ID
- Client
- Reviewer and Coordinator
- Invoice Date and Invoice Due Date
By clicking the Matter Name in the Invoice you will open the Invoice Review page for this Invoice.
The only functions you can perform directly from the Invoice section of the Matter page are:
- Download Invoice
- Delete
These functions can both be accessed from the Actions menu.
Emails
Provides a list of all Emails synced from all users which have either been linked to the Matter manually, or contain the Matter Id in the email subject.
To learn more about Email views and the kinds of actions you can do here, please take a look at the general Email page, as the actions are the same.
Metadata
This section allows you to assign Metadata (or tags) to your Matter. Types of Metadata available to a Matter are set in the Entity Parameters List page, accessed from the Administration menu. Currently none have been assigned - so you can't do anything here!